It can also be. Install the Apache server.
Reverse Proxy Guide Apache Http Server Version 2 4
There are a lot of modules used in Apache to make it a reverse proxy however.

. This article explains how to install and configure apache reverse proxy configuration step by step for HTTPS Server on UbuntuDebian. The address and port fields should be enabled now. Unlike Nginx just to reverse proxy one backend server.
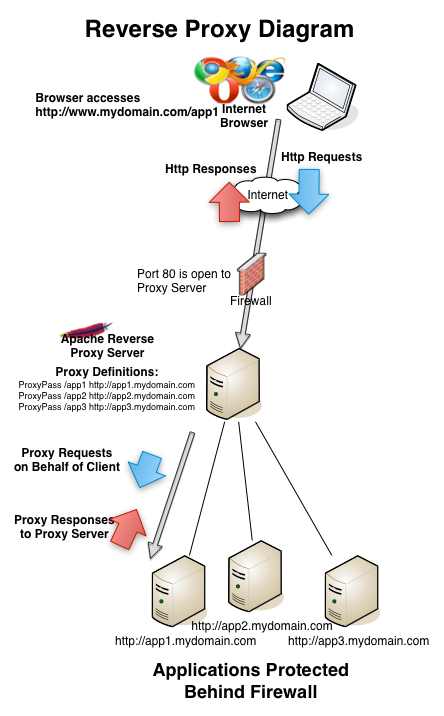
In this document plain HTTP one-way HTTPS and Mutual HTTPS protocol using X509 certificates scenarios are covered with sample configuration templates. Now comes the Proxy block where the connection to the backend is more precisely defined. There are many reasons to install and configure a proxy server.
Module proxy already enabled Enabling module proxy_ajp. Requestheader set x - forwarded - proto https requestheader set x - forwarded - port 443 this is a two step conditional reverse proxy first line indicates the condition that should be met before the call getting reverse proxied here the condition is apply the reverseproxy if the domain name http_host name matches wwwmwinventoryin. Some other common mods you may need are below.
Step By Step Guide To Configure Apache Reverse Proxy Step 1. Sudo a2enmod proxy_ajp Considering dependency proxy for proxy_ajp. Configure Apache to work as a reverse proxy.
Proxy proxy_ajp proxy_http rewrite deflate headers proxy_balancer proxy_connect proxy_html. Configure BBC port 383 connection on reverse proxy. Sudo systemctl restart apache2 Apache is now ready to act as a reverse proxy for HTTP requests.
Mod_proxy mod_http mod_headers mod_html To enable mods in Ubuntu Debian you need to make sure they are installed then enabled. Address enter localhost or the IP address of your system 19. Further below in the tutorial we will also be adding a load balancer to this block.
Cd etcnginxsites-available sudo vim. You have to configure like complete loadbalancer else Apache on minimum error will serve local directories. Install Latest Release of Nginx.
Apache Reverse Proxy configuration. To check the reverse proxy load balancing open the web browser enter the following URL http1921681100 Where 1921681100 is the IP address of the reverse proxy server. Or alternatively you can run the following commands to enable the modules one by one.
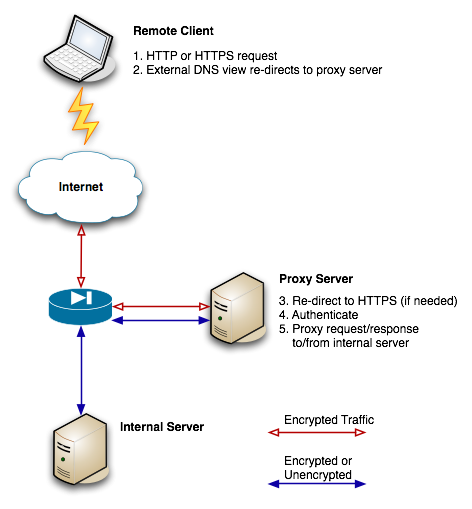
Apache must be manually configured to function as a reverse proxy. This white paper explains step-by-step on how to configure Apache Server as Reverse proxy solution for Fiori Applications. Specifically this is where requests are authenticated and authorized.
Reference - support for OMi data collectors. Port enter 8080. Unlink Default Configuration File.
Apt-get update apt-get install apache2 Enable the required Apache modules. Setting up a Backend server. Configure the secure reverse proxy to require client authentication - optional.
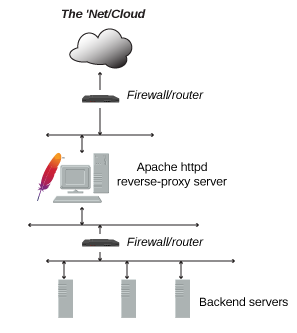
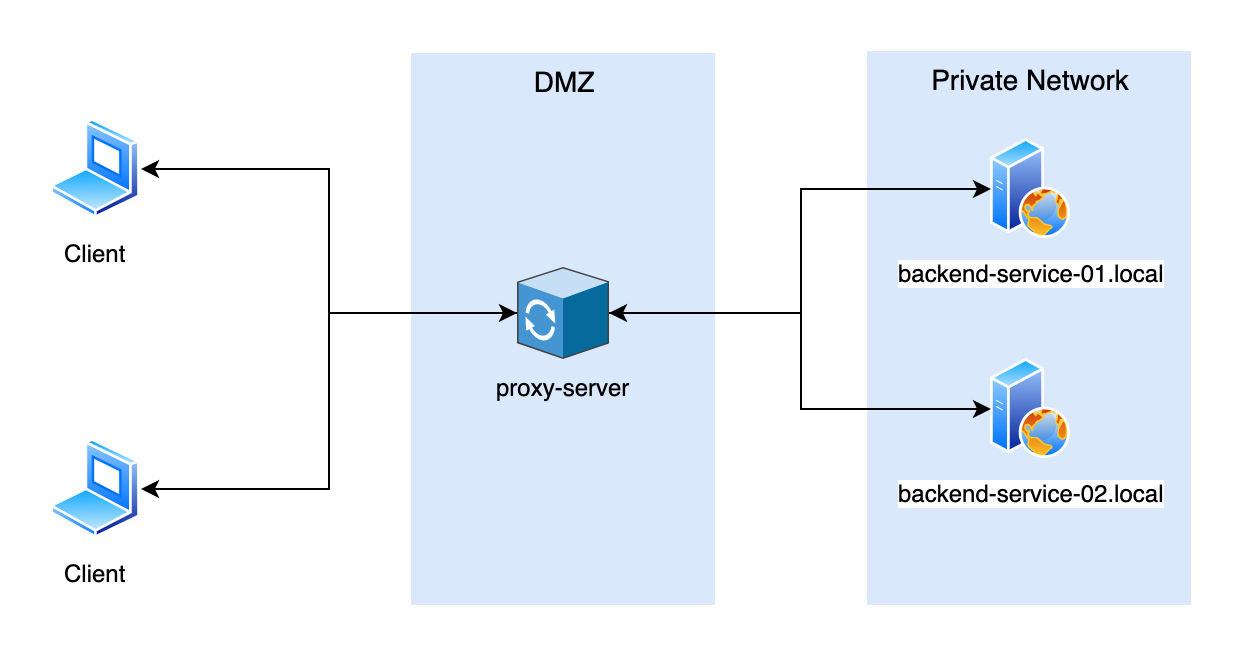
Apache Reverse Proxy Loadbalancer Configuration Step by Step We will take it granted that the backend servers youll loadbalance are HTTPS. Apache as Reverse Proxy for Fiori Applications. Step by Step It can hide the origin server thus making it more secure immune to attacks It can act as a load balancer A reverse proxy can also be used to encryptingdecrypting web server traffic thus taking some load off from the backend.
Continuing on in the configuration. Reference - support for OMi application users. These will help us verify if the configuration works properly but if you already have your own backend application s you can skip to Step 3.
Apt y update apt y upgrade Now install Apache and Lets Encrypt. Check Use this proxy server for all protocols 21. On the new pop-up check Manual proxy configuration.
Firstly ensure that Apache is installed 1 yum install httpd mod_ssl -y 2. The purpose of a reverse proxy is that of protecting an application server. Apt y install apache2 python-letsencrypt-apache Once the installation is complete edit the config for your Virtual Host.
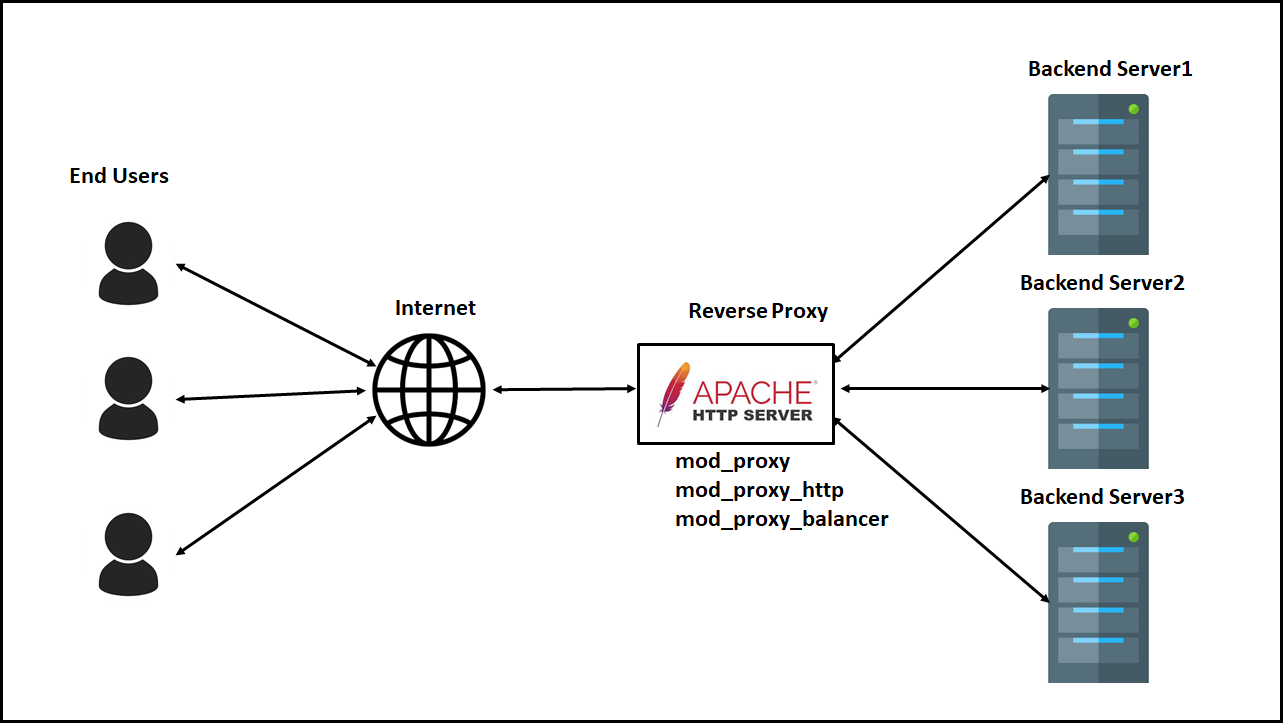
Configure Apache to work as a reverse proxy. To set up Apache as a reverse proxy server you will need to enable mod_proxy. For Example reverse proxy can help you to add security for load balancing restrict access to certain locations in order to prevent attacks and many more.
Enter the directory etcnginxsites-available and create a reverse proxy configuration file. If you want to build your Reverse-Proxy without a domain you can skip the points on Lets Encrypt. Optional Nginx Configuration Options.
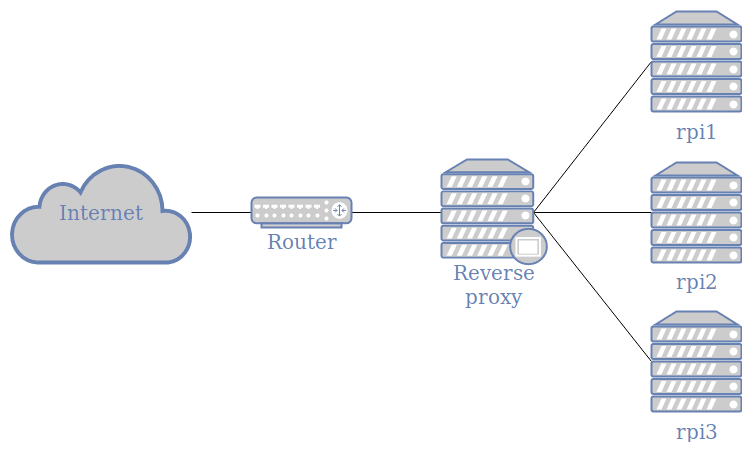
Now open the URL from two other machines or browsers all the three opened webpages should be coming from the different application servers. Vi etcapache2sites-enabled000-defaultconf Here is the file before our configuration. Install Apache HTTP Server as a service Open Command Prompt Type cd Apache24bin and press Enter Type httpdexe -k install and press Enter Verify that Apache HTTP Server was installed succesfully Open Services servicesmsc Look for service named Apache24 Start service Disable HTTPS for URIs on PhenixID server.
In the next optional step we will create two very basic backend servers. To activate the new configuration you need to run. Test and Restart Nginx.
The list of modules. Link and Activate Configuration File. Here are the standard Nginx reverse proxy directives used by Kinsta to load a subdirectory site over a reverse proxy.
Start Nginx and Configure to Launch on Reboot. A2enmod rewrite a2enmod headers a2enmod proxy a2enmod proxy_http Edit the Apache configuration file for the default website. For example installing and enabling mod_proxy would look like this.
Create New Configuration File.
Move Subdomains Into Subfolders By Configuring Apache Reverse Proxy Uptime Through Simplicity
Apache Reverse Proxy Content From Different Websites By Albin Issac The Startup Medium
How To Configure Apache As Reverse Proxy Ubuntu Cloud Server
Reverse Proxy Why And How With Apache The Lowe Down
How To Configure Apache Reverse Proxy

Setup Apache As Reverse Proxy For Tomcat Server Tec
How To Use Apache As A Reverse Proxy On Ubuntu 20 04 Synaptica Srl
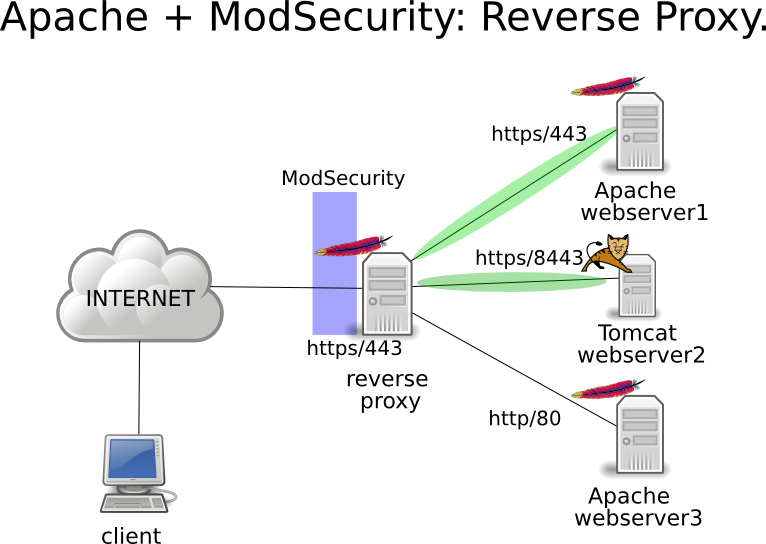
Apache Reverse Proxy Modsecurity Meister Maltez
0 comments
Post a Comment